Creating a Project:
You start working in GarageBand by creating a new project.
To create a new project:
1. Choose File > New.
2. In the New Project dialog, select the type of project you want to create.
3. In the dialog that appears, browse to the location where you want to store the project, then type a name for the project in the Name field.
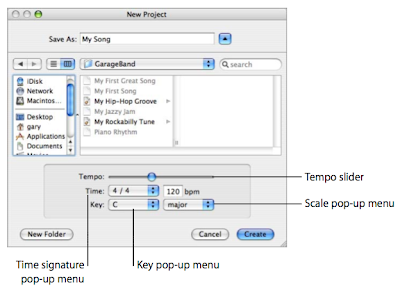
4. Set the project’s tempo, key, and time signature as described in the following sections.
5. When you have finished making the project settings, click Create.
Setting the Tempo:
Each project has a speed, or tempo. The tempo defines the rate at which beats, the
basic rhythmic pulse, occur in the project. The tempo is measured in beats per minute,
or bpm. You can set the tempo to any speed between 60 and 240 bpm.
The default tempo is 120 bpm, which is a common tempo used in popular music.
To set the tempo:
In the New Project dialog, drag the Tempo slider left to slow down the tempo, or right
to speed up the tempo.
 Note: You can change the tempo later in the time display, located below the timeline,
or in the Track Info pane for the master track.
Setting the Key:
Each project has a key, which defines the central note to which the other notes in the
music relate, and the scale used (either “major” or “minor”).
To set the key:
1. In the New Project dialog, choose a key from the Key pop-up menu.
2. Choose the scale from the Scale pop-up menu to the right of the Key pop-up menu.
Note: You can change the key later in the Track Info pane for the master track.
If you change the key of a project after recording instruments or adding loops, all
Software Instrument recordings and loops are transposed to the new key. Real
Instrument recordings are not transposed.
Setting the Time Signature:
Each project also has a time signature, which controls the relationship between beats
and measures. A project’s time signature consists of two numbers separated by a
forward slash, which look similar to a fraction. The number on the left controls the
number of beats in each measure, and the number on the right controls the beat value
(the length of the note that gets one beat).
You can use any of the following time signatures in a GarageBand project:
- 2/2, 2/4, 3/4, 4/4, 5/4, 7/4, 6/8, 7/8, 9/8, or 12/8.
To set the time signature:
In the New Project dialog, choose a time signature from the Time pop-up menu.
Note: You can change the time signature later in the Track Info pane for the
master track.
Opening an Existing Project:
You can open an existing project to continue working.
To open an existing project:
Choose File > Open, locate and select the project you want to open, then click OK.
You can also open a recently open project by choosing File > Open Recent and
choosing a project from the submenu.
If you close the currently open project, a dialog appears, asking if you want to create a
new project or open an existing project.
Saving a Project:
As you work, it’s important to save your project often so you don’t lose your changes.
To save a project:
Choose File > Save (or press Command-S).
When you save a project, by default GarageBand creates an iLife preview that is saved
with the project. An iLife preview lets you preview the project in the Media Browser
and in other iLife applications, but can increase the project’s file size. You can select
whether to create an iLife preview for projects in the General pane of GarageBand
Preferences.
You can also save a project as an archive. When you save a project as an archive, all the
audio files, loops, and other media the project uses are saved in the project file. This is
especially useful if you want to copy the project to another computer, or are
duplicating a project with your own Real Instrument recordings.
To save a project as an archive:
1. Choose File > Save as.
2. In the Save As dialog, select the Save As Archive checkbox.
You can also compact projects to make sharing easier.
Compacting a project reduces the file size by compressing audio in the project.
Compacting can result in some loss of audio quality.
To compact a project:
1. Choose File > Save as.
2. In the Save As dialog, select the Compact Project checkbox.
3. Choose the compression settings you want to use from the pop-up menu next to the Compact Project checkbox.
Sending a Project to iTunes:
You can send a project to an iTunes playlist, then play your exported projects in iTunes, download them to an iPod, or burn the playlist to a CD.
Files are exported to iTunes in AIFF format. You can convert the exported file to another format, such as AAC or MP3, from within iTunes.
To send a project to an iTunes playlist:
- Choose Share > Send to iTunes.
You can set the name of the iTunes playlist to which files will be exported, and also set
the name of the album and composer, in the Export pane of GarageBand Preferences.
You can also export a single track, or a group of tracks, to an iTunes playlist.
To export a single track, solo the track (or mute all other tracks) before exporting.
To export a group of tracks, solo the tracks (or mute all other tracks) before exporting.
What Is Mixing?
When you’ve built the arrangement of your project, the next step is to mix the project.
Mixing is where you step back and listen to the overall sound of the music, and make
changes to tracks and the project to balance the different parts, bring the music into
focus, and give it the right “sound.”
Mixing typically consists of the following steps:
- Balancing volume levels
- Setting pan positions
- Creating dynamic changes with volume and pan curves
- Shaping the music with effects
Setting Track Volume Levels:
The instruments and loops you use in your project may have different volume
(loudness) levels. In order to hear all the parts you’ve added, you balance the volume
levels so that no track overwhelms the others, and no track is lost in the mix.
This doesn’t mean that every track should be set to the same volume level. In
commercial mixes, certain tracks (typically the lead vocals, drums, and lead or solo
instruments) are louder, while other tracks (the backing instruments and vocals) are
softer.
To set track volume levels:
- For each track, drag the volume slider left to lower the volume level, or drag it right to raise the volume level
Setting Track Pan Position:
Setting different tracks to different positions in the stereo field (panning) helps make it
easier to distinguish each track in the mix, and create a sense of three-dimensional
space to your project.
In commercial music, the most important tracks (typically the lead vocals, drums, and
lead or solo instruments) are panned to the center or close to center, while other tracks
(the backing instruments and vocals) are panned left and right. Panning tracks no
farther than 50 percent left or right creates a natural sense of space, while panning
tracks to the extreme left or right creates a more unusual, artificial sound.
To set track pan positions:
- For each track, drag the pan dial left to pan the track farther to the left, or drag it right to pan the track farther to the right. You can also click along the edge of the dial to set it to a specific position.
Using Volume and Pan Curves:
In addition to setting track volume and pan, you can add volume and pan changes
over time using volume curves and pan curves. Making changes over time is called
automation, and GarageBand lets you automate volume and pan changes for each
track.
To turn on a track’s volume or pan curve:
1. Click the triangle to the right of the Solo button in the track’s header.
A blank row for the track’s volume and pan curves appears below the track.
2. From the pop-up menu on the left side of the row, choose Track Volume or Track Pan.
Once you turn on a track’s volume or pan curve, you make changes by adding control
points to the curve, then dragging the control points to change the value for volume or
pan at that point in time.
To add a control point:
- Click the line in the editor at the point in time where you want to add a control point.
- Drag the control point up or down to a new value.
- Drag the control point left or right to move it to a different point in time.
beats in the timeline.
Setting the Output Volume:
You can set the output volume of a project using the master volume slider, located
below the lower-right corner of the timeline. You should adjust the output volume to a
level high enough to eliminate background noise, but not high enough to cause
clipping.
The master volume slider controls the volume of the project when it is exported. Use
your computer’s volume control to adjust the volume at which you listen to the project
play.
To set the master volume:
- Drag the master volume slider left to lower the output volume, or right to raise the output volume. Option-click the slider to return it to a neutral value (0 dB gain).
- As the project plays, watch the master level meters located above the master volume slider. Before you export a project, make sure the small red dots to the right of the level meters are not lit. These dots (called clipping indicators) light to show that the volume level of the project at some point is too high, which will cause distortion or “clipping” in the exported project.

Adding Fade Ins and Fade Outs:
A very common mixing technique is to add a fade in at the beginning of a project, and
a fade out at the end of the project. Fade ins make the music seem to “come out of
nowhere,” and fade outs create the feeling that the project continues playing. You can
easily add fade ins and fade outs to your projects, and add other volume changes to
the project over time.
To add a fade in:
1. Choose Track > Show Master Track.
The master track appears at the bottom of the timeline.
2. From the pop-up menu in the master track’s header, choose Master Volume.
The master volume curve appears in the master track.
3. Click the master volume curve at the point you want the fade in to end.
4. Drag the control point at the beginning of the master track down to the volume level
at which you want the fade in to start. To start with complete silence, drag it all the way down.
Now play the project from the beginning. You’ll hear all the tracks in the project fade in gradually to their final volume level.
To add a fade out:
1. Choose Track > Show Master Track.
The master track appears at the bottom of the timeline.
2. From the pop-up menu in the master track’s header, choose Master Volume.
The master volume curve appears in the master track.
3. Click the master volume curve at the point you want the fade out to begin, then click
at the point you want the fade out to end.
4. Drag the second control point down to the volume level at which you want the fade
out to end. To end with complete silence, drag it all the way down.
Now play the project from a point before the fade out begins. You’ll hear all the tracks
in the project fade out gradually to their final volume level.
Transposing Part of a Project to a Different Key:
Many projects move to different keys at some point in the project; they may stay in the
new key, or return to the original key at a later point in time. You can move an entire
project to a new key, called transposing (or modulating), in the project’s master track.
To transpose part of a project to a different key:
1. Choose Track > Show Master Track.
The master track appears at the bottom of the timeline.
2. From the pop-up menu in the master track’s header, choose Master Pitch.
The master pitch curve appears in the master track.
3. Click the box to the left of the words “Master Pitch” to turn on the master pitch curve.
4. Click the master pitch curve at the point you want to change the pitch of the project.
5. Drag the control point up or down to the new key. Unlike with volume and pan curves, the control points on the master pitch curve move in discrete steps of a semitone.
Note: When you transpose a project to a new key, Real and Software Instruments (both
those you’ve recorded and loops) are transposed. Any audio files added from the Finder
are not transposed.
Using Effects:
Effects let you shape and enhance the sound of your music in a variety of ways. Anyone
who’s listened to popular music on the radio, or listened to the soundtrack of a movie,
has heard the different effects used in contemporary music.
GarageBand includes a complete set of studio-quality effects that you can use on individual tracks or the overall project to shape the sound of your music.
GarageBand includes the following types of effects:
Equalization (EQ): EQ is a powerful and versatile effect that lets you change the level
of selected frequencies. You can use EQ to make both subtle and dramatic changes to
your projects. EQ is likely the most commonly used effect in popular music.
Dynamics: Dynamics effects, which include compressors and noise gates, let you
control the volume of your music over time.
Reverb and Echo: Reverb and echo are both time-based effects. Time-based effects
store a copy of the sound and play it back at a later point in time, creating a sense of
space.
Modulation: Modulation effects, which include chorus, flangers, and phasers, build on
the time-based effects by shifting or modulating when the copied signal plays back.
They can also involve detuning the copied signal relative to the original.
Distortion: Distortion effects, which include amp simulation and overdrive (and, of
course, distortion!), change the tone of the original sound to recreate analog or digital
distortion.
Other effects: Other effects included with GarageBand, such as tremolo and Auto
Filter, change the sound in different ways.
Adding Effects:
Each Real and Software Instrument track has a set of effects, which include a
compressor, equalizer (EQ), echo, and reverb. You can adjust a track's effects, and add
up to two additional effects, in the Track Info pane. Real Instrument tracks also include
a noise gate effect.
The master track includes its own effects. You can adjust the master effects and add
one additional effect to the master track in the Track Info pane.
To add an effect:
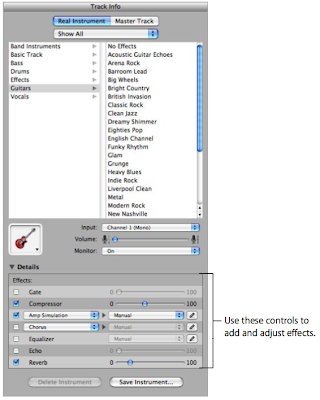
1. Click the Track Info button (the letter “i”) or choose Track > Show Track Info to show the
Track Info pane.
2. If needed, click the Details triangle to show the Effects section of the window.
3. Choose the effect you want to add from one of the pop-up menus along the left.
Instrument tracks have two effect pop-up menus, and the master track has one.
Adjusting Effects:
Each effect has either a slider that you can use to adjust the amount of the effect, or a
pop-up menu from which you can choose different effect presets.
To adjust a track’s effects:
1. Select the track, then click the Track Info button to open the Track Info pane.
2. Click the Details triangle to reveal the track’s effects settings.
3. Drag the sliders for the Gate, Compressor, Echo, and Reverb effects to adjust the
amount of each effect. Choose a new setting from the Equalizer pop-up menu to adjust
the equalization. If your project is playing, you hear the changes in real time.
4. Choose an effect from one of the effect pop-up menus on the left, then choose an
effect setting for the effect from the preset pop-up menu on the right.
Additional effects you can add include treble reduction, bass reduction, amp
simulation, chorus, flanging, phase shifting, and tremolo.
Turning Effects On and Off:
You can turn individual effects on or off (turning an effect off temporarily is called
bypassing the effect). This has several advantages: It lets you hear how each effect
changes the sound of your music, and lets you see which effects have the greatest
impact on your computer’s performance.
When you turn off an effect, the effect’s current settings are retained, so any
adjustments you have made are not lost.
To turn an effect off:
- In the Effects section of the Track Info pane, deselect the checkbox next to the effect. Select the checkbox to turn the effect on again.
Choosing Effect Presets:
Some effects includes several presets, which let you easily adjust the effect’s settings to achieve a particular sound.
To choose an effect preset:
- Choose the preset you want from the pop-up menu to the right of the effect.
Editing Effect Presets:
You can adjust effect presets to fine tune the sound of the effect, and save your own
presets to use with other instruments or in another project.
To edit an effect preset:
1. Click the Edit button (with the pencil icon) to the right of the effect’s preset pop-up
menu.
The effect’s Preset window appears. Each preset setting has a slider, button, or other
control, which is labeled to indicate its purpose.
2. Drag the sliders in the Preset window to adjust the settings for the preset.
When you adjust an effect preset, it appears as “Manual” in the pop-up menu, so you
know you’ve changed it from the original preset. You can go back and forth between
your Manual settings and other presets to compare them before saving the new preset.
Saving Effect Presets:
You can create your own effect presets and save them to use on another track or in
another project.
To save an effect preset:
1. Adjust the settings for the preset to get the sound that you want.
2. Choose Make Preset from the pop-up menu, then type a name for the preset in the Save dialog.
The Editor:
The editor is like a microscope showing a close-up view of part of a track.
You can edit Real and Software Instrument regions in a variety of ways in the editor.
For Real Instruments:
When you select a Real Instrument track, the editor shows the waveform of the track or selected region.
You can move, crop, join, transpose, and rename regions in the editor.
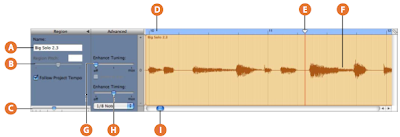
A - Region Name field: Type a new name for the selected region in the field.
B - Region Pitch slider and field: Drag the slider to transpose the selected Real Instrument region up or down by up to 12 semitones.
You can also type the number of semitones in the field.
C - Zoom slider: Drag to zoom in for a closer view or to zoom out to see more of the track or selected region.
Zooming in the editor is independent of the timeline.
D - Beat ruler: Shows beats and measures for the area visible in the editor.
E - Playhead: Shows the point in the project currently playing.
F - Waveform display: Shows the waveform of the regions in the track.
G - Enhance Tuning slider and checkbox: Drag right to increase the amount of tuning enhancement, or drag left to lower the amount.
The limit to key checkbox limits tuning enhancement to the project’s key.
H - Enhance Timing slider and pop-up menu: Drag right to increase the amount of timing enhancement, or drag left to lower the amount.
Choose the note value to use and the basis for timing enhancement from the pop-up menu.
I - Scroll bar: Drag the scroller to move to a different part of the track.
For Software Instruments—Graphic View:
When you select a Software Instrument track, the editor shows a graphic display of the track or selected region.
You can edit individual notes in Software Instrument regions, fix the timing of notes, and transpose and rename regions.
You can also show and edit controller data for pitch bend, a modulation wheel, or a sustain pedal, recorded when you play your music keyboard.
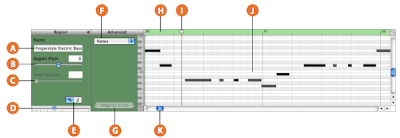 A - Region Name field: Type a new name for the selected region in the field.
B - Region Pitch slider and field: Drag the slider to transpose the selected Software Instrument region up or down by up to 36 semitones.
You can also type the number of semitones in the field.
C -Velocity slider and field: Drag the slider to change the velocity of selected notes.
You can also type the velocity value in the field. A note’s velocity reflects how hard the key is pressed when you play the note.
D - Zoom slider: Drag to zoom in for a closer view or to zoom out to see more of the track.
E - Graphic/Notation View buttons: Click to change the editor to graphic view or notation view.
F - Display pop-up menu: Choose whether to show notes or controller data in the editor.
G - Fix Timing button: Click to fix the timing of notes in the selected region, or notes selected in the editor, so that notes move to the nearest grid position.
H - Beat ruler: Shows beats and measures for the area visible in the editor.
I - Playhead: Shows the point in the project currently playing.
J - Notes/controller data display: Shows the individual notes of Software Instrument regions in a graphic format.
You can move and resize notes to adjust their pitch, where they start playing, and how long they play.
Shows controller data when chosen in the Display pop-up menu.
K - Scroll bar: Drag the scroller to move to a different part of a track.
For Software Instruments—Notation View:
You can also view Software Instrument tracks and regions in notation view.
In notation view, notes and other musical events are shown in standard music notation.
You can edit notes and edit controller information (including velocity and pedal markings for sustain) in notation view.
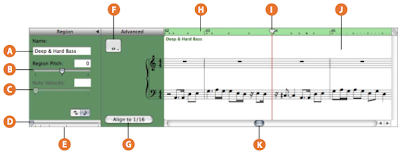 A - Region Name field: Type a new name for the selected region in the field.
B - Region Pitch slider and field: Drag the slider to transpose the selected Software Instrument region up or down by up to 36 semitones.
You can also type the number of semitones in the field.
C - Velocity slider and field: Drag the slider to change the velocity of selected notes.
You can also type the velocity value in the field.
A note’s velocity reflects how hard the key is pressed when you play the note.
D - Zoom slider: Drag to zoom in for a closer view or to zoom out to see more of the track.
E - Graphic/Notation View buttons: Click to change the editor to graphic view or notation view.
F - Note Value button: Click to choose the note value for notes you add.
G - Fix Timing button: Click to fix the timing of notes in the selected region, or notes selected in the editor, so that notes move to the nearest grid position.
H - Beat ruler: Shows beats and measures for the area visible in the editor.
I - Playhead: Shows the point in the project currently playing.
J - Notation display: Shows the musical events of Software Instrument regions in standard music notation.
You can move notes to adjust their pitch and where they start playing, and change how long they play.
K - Scroll bar: Drag the scroller to move to a different part of a track.
For Podcasts and Video—Marker View:
When you are working on a podcast episode, you can view and edit markers in the editor.
In the marker list you can edit each marker’s time position, marker region artwork, URL, URL title, and chapter title.
You can also add episode artwork in the editor.
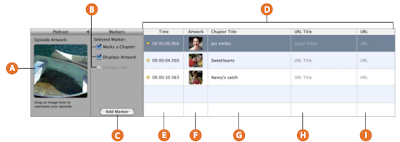
A - Preview: (Appears only when creating a podcast.)
B - Marks a Chapter checkbox: Shows whether the selected marker marks a chapter.
- Displays Artwork checkbox: Shows whether the selected marker contains marker region artwork. (Appears only when creating a podcast.)
- Displays URL checkbox: Shows whether the selected marker has a URL.
D - Marker list: Shows each marker’s start time, artwork (for podcasts) or video frame (for videos), chapter title, URL, and URL title.
E - Time column: Shows the start time for each marker.
F - Artwork column: Shows the artwork for each marker region.
Add artwork by dragging image files from the Media Browser. (Appears only when creating a podcast.)
- Still Frame column: Shows the video frame at the position of each marker. (Appears only when working with a video.)
H - URL Title column: Shows the title of each marker region’s URL. Click and type a title for the URL.
I - URL column: Shows the URL for each marker region. Type a URL (address) for the website for which you want to show a link.
Selecting Regions:
In order to edit a region in the editor, you first select the region in the timeline.
To select a region, do one of the following:
- Select a single region by clicking it.
- Select multiple regions by Shift-clicking.
- Drag from a point before the first region to a point after the last one to select the regions in between.
Editing Real Instrument Regions:
You can edit Real Instrument regions in the editor in several ways.
You can:
- Move regions
- Crop part of a region
- Join regions
- Enhance the tuning of single-note (monophonic) regions
- Enhance the timing of regions
Moving Real Instrument Regions:
You can move Real Instrument regions in the editor in order to align them precisely with measures and beats, or with other regions.
To move a Real Instrument region in the editor:
1. Move the pointer over the top part of the region, close to the beat ruler.
The pointer becomes a move pointer (a vertical line with arrows pointing left and right).
2. Drag the region to its new position.
Cropping Part of a Real Instrument Region:
You can easily cut part of a Real Instrument region, whether at the beginning, the end, or in the middle of the region.
This is especially useful if you want to delete, move, or copy an individual note, chord, or phrase in a region.
To crop part of a Real Instrument region:
1. Move the pointer over the place where you want to cut the region (except at the top).
The pointer becomes a crop pointer (a crosshair).
2. Drag to select the part of the region you want to crop.
The selected part of the region appears darker blue.
3. Click the selected part of the region.
4. The selected part is cropped from the rest of the region, and is now a separate region.
You can select it, delete it, move it, or copy it, just as you would any Real Instrument region.
Joining Real Instrument Regions:
You can join Real Instrument regions that are next to each other in the editor.
To join regions:
- Select the regions, then choose Edit > Join (or press Command-J).
Enhancing the Tuning of Real Instrument Tracks:
You can enhance the tuning of a Real Instrument track.
This is especially useful when you record Real Instrument regions that have the right “feel” and timing but are not perfectly in tune.
When you use the Enhance Tuning slider, all regions on the selected track (both your own recordings and loops) are enhanced.
Enhance Tuning can only produce accurate results on single-note (monophonic) Real Instrument regions, so be sure the track does not include regions with chords or unpitched sounds.
By default, Enhance Tuning enhances the tuning of notes by moving them to the closest note in the project’s key.
You can limit the enhancement to the notes of the chromatic scale instead by deselecting the “Limit to key” checkbox.
To enhance the tuning of a Real Instrument track:
1. In the timeline, select the Real Instrument track you want to enhance.
2. Drag the Enhance Tuning slider right to increase the amount of tuning enhancement, or drag it left to decrease the amount of enhancement.
3. To limit tuning enhancement to the chromatic scale, deselect the “Limit to key” checkbox below the slider.
You hear the results immediately as the project plays.
Setting the Enhance Tuning slider to higher values can sometimes lead to undesirable results.
Listen carefully to the results of using the slider and set it to the value that sounds best.
Enhancing the Timing of Real Instrument Tracks:
You can enhance the timing of a Real Instrument track.
This is especially useful when you record Real Instrument regions where the notes are the right pitch, but are not perfectly in time with the project.
When you use the Enhance Timing slider, all regions on the selected track (both your own recordings and loops) are enhanced.
You can enhance the timing of single-note, chordal, and percussion (unpitched) Real Instrument regions.
Enhance Timing works better with regions that contain distinct patterns of notes than with pads or ambient sounds.
To enhance the timing of a Real Instrument track:
1. In the timeline, select the Real Instrument region you want to enhance.
2. Drag the Enhance Timing slider to the right to increase the amount of timing enhancement, or drag it left to decrease the amount of enhancement.
If you move the Enhance Timing slider while the project is playing, it may take a moment for it to “catch up” with the music.
The Enhance Timing slider may not work equally well with all musical material, especially when set to higher values.
Listen carefully to the results of using the slider and set it to the value that sounds best.
Editing Software Instrument Regions:
You can edit Software Instrument regions in the editor in several ways.
You can:
- Edit individual notes (including the note’s pitch, duration, and timing)
- Edit controller information (including velocity, mod wheel, pitch bend, and sustain)
Editing Notes in a Software Instrument Region:
You can edit individual notes of a Software Instrument region.
When you view the region in the editor, individual notes in the region are displayed in a graphic format:
- The left edge of the note shows the point in the timeline it starts playing.
- The width of the note shows how long it plays.
- The vertical position of the note shows its pitch, in relation to the piano keyboard displayed vertically along the left edge of the editor.
You can also select multiple notes and edit them at the same time.
Note: To edit notes in the editor, you may need to zoom in so that the notes are large
enough to select and edit.
To edit notes in a Software Instrument region:
- Drag the note left or right to a new starting point. You can use the beat ruler in the editor to align the note with a specific beat or measure.
- Drag the lower-right corner of the note to resize it.
- Drag the note up or down to raise or lower its pitch. Use the piano keyboard along the left edge of the editor to see the pitches.
To select multiple notes:
- Shift-click or Command-click the notes you want to select.
- Drag from a point before the first note to a point after the last note, enclosing the notes you want to select.
For example, if you select several notes and drag them to a new starting point, each note is moved by the same number of beats.
If you resize several notes at the same time, each note is shortened or lengthened by the same amount. If you drag several notes up or down to a different pitch, each note is changed by the same number of semitones.
You can also fix the timing of individual notes in the editor.
When you fix the timing of notes in the editor, the selected notes move to the nearest grid position, as set in the timeline grid menu in the upper-right corner of the editor.
To fix the timing of individual notes:
- Select the notes you want to fix in the editor, then click the Fix Timing button (with the text “Align to” followed by a note value).
Editing Controller Information in a Software Instrument Region:
Most music keyboards designed to be used with computer music programs include “controllers” for pitch bend and modulation.
These controllers are often circular “wheels” placed at the left end of the keyboard. Some keyboards also include other controllers, such as a sustain pedal, a foot controller, or an expression control.
Moving the pitch bend wheel while you play causes the notes you play to bend up or down in pitch, like a guitar.
Moving the modulation wheel creates changes in the sound of the Software Instrument.
The changes are different for different instruments, but often involve changing the frequency, rate, or intensity of a filter applied to the instrument.
If you move a controller while recording a Software Instrument, the movements are recorded in the Software Instrument region.
You can see the movements you recorded and edit them in the editor.
To display controller information for a Software Instrument region:
1. Double-click the region to open it in the editor.
2. Choose the type of controller information you want to see from the Display pop-up menu.
Controller information is displayed as a line with “dots” at different points in time, similar to the way volume and pan curves are displayed in the timeline.
Each “dot” (called a control point) shows a change in value (in this case the movements of the controller) at that point in time.
You can edit the controller information by adding new control points, and by adjusting control points to change their value or to change where in the timeline they occur.
To add a control point:
- Click the line in the editor at the point where you want to add a control point.
- Drag the control point up or down to a new value.
- Drag the control point left or right to move it to a different point in time.
