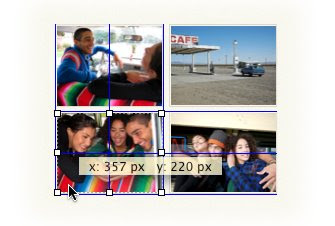
Turn on the alignment guides for a picture perfect layout:
In iWeb, center guides are turned on by default and can help you place objects in the center of the page horizontally or vertically.
However, you can also get object edge guides that help you line up or match size of individual objects on the page.
To turn on edge guides, go to the iWeb menu and select Preferences, then check "Show guides at object edges".
Now when you select or move an object, you will see blue guidelines showing the center and edge alignment of the objects your are moving in relation to other objects on the page.
 It's a great way to make sure everything on your site lines up just the way you want it.
Post entire photo albums instantly:
When you drop the album onto a page, iWeb will automatically create a new photo page for your album, fill it with the photos from the album you dropped, add the page to your site navigation, and create a link to the new photo page right where you placed it.
By default, the first photo from the album will be used as the image that links to the new page.
It's a super-easy way to create good looking links to all of your photo albums from anywhere on your site.
Let visitors leave comments on your blogs and podcasts:
When you write (or rant) about the issue of the day, your visitors will be able to leave comments, share opinions, and even attach files to add to the conversation.
You can also allow visitors to attach files of up to 5 MB by selecting "Allow attachments."
As the site publisher, you can also delete unwanted comments from within iWeb or by visiting your site, clicking on the "lock" icon and signing in with your .Mac/MobileMe account ID.
Masking images to fit your site:
Sometimes an image you want for your website isn't really framed or cropped the way you would like it. iWeb makes it easy to change the framing of your image to show just the part you want.
- First drop the image onto your web site.
- Make sure the image is selected and click the Mask button on the iWeb toolbar.
- A movable, resizable region will appear on your image.
- Move or resize it to show just the part of the image you want, and then deselect the image to apply the mask.
However, if you ever want to undo the mask, simply select the image again and click Unmask from the iWeb toolbar.
Share your iTunes playlists:
iWeb enables you to drag iTunes playlists right from the media browser to your web page.
Your site visitors can now click on the links to check out your selections. Done.
Quickly create links to external sites:
Want to post a list of your favorite links to your website?
You could manually type in the URLs for all your favorite sites, but there's an easier way.
Just visit any web site using Safari and then drag the icon in the Safari address anywhere on your web page to create a clean, text-based link to the site.
Want to apply the link to an image or icon on your page?
Just drag the link to the image and it will automatically be linked. Simple!
Quickly create links to pages in your own site:
You can also quickly and easily create links between pages on your own site.
Just drag the relevant page icon from the site organizer to your page.
- If you just drop it on the page, it will create a formatted link to the page.
- If you drop it onto an image or icon, the image will be linked to the page.
For example, pick a set of images representing the different pages in your site.
Your site now has a great-looking custom navigation page.
Suppress iWeb's Standard Navigation:
iWeb automatically creates and maintains the navigation bar for you, but what if you want to exclusively use your own and lead your guests through your site?
You can remove a page from the navigation bar by going to the page inspector and un-checking the "Include page in navigation menu" box.
- Uncheck that box for all the pages... and iWeb will completely remove the navigation bar.
Add a search box to your blog:
Make it easy for your visitors to find what they're looking for.
On the Blog & Podcast inspector, select "Display search field" so visitors can search your archives.
Getting More Help:
There are several resources you can consult for additional help with iWeb:
- Onscreen help: iWeb comes with a built-in help system. When iWeb is open, choose Help > iWeb Help. When the help opens, type a word or phrase in the search field atthe top, or click a topic to get detailed instructions for completing specific tasks.
- Video tutorials: These short videos demonstrate how to do common tasks in iWeb. To access them, open iWeb Help, and then click “How-to videos” (available in some languages only).
- Help tags: Available for many onscreen items. To see a help tag, let the pointer restover an item for a few seconds.

Publish Your Website on the Internet:
First, make sure you have at least a free trial MobileMe subscription.
You (and others) can access your iWeb website until the trial period expires; as soon as you become a MobileMe member, you can publish your site again.
To get a free or full MobileMe subscription, visit www.me.com.
To publish your website to MobileMe:
- Click Publish (or choose File > “Publish to MobileMe”).
Now to go to the site in your web browser. To send an email notifying people about your website, click Announce.
If you purchased your own domain name (for example, www.example.com) from a service provider, you can use that URL for websites you create with iWeb.
To use your own domain name for a site published to MobileMe:
1. Choose File > Set Up Personal Domain.
2. On the MobileMe website, follow the onscreen instructions.
Anyone who has access to the Internet can visit your site.
People who know the URL can go directly to your website, or your website might appear as a search result.
If you don’t want your website to be visible to everyone on the Internet, you can set up your website so that only people who know the user name and password can visit it.
To protect your site with a password:
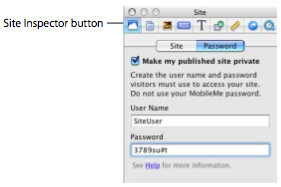
1. If the Site Inspector isn’t open, click Inspector in the toolbar (or choose View > Show Inspector), and then click the Site Inspector button.
2. Click Password.
 3. Select the “Make my published site private” checkbox.
4. Type a user name and password in the fields.
Everyone you want to access your site uses the same user name and password.
Important: Don’t enter your MobileMe user name and password; create a name and password that would be hard to guess.
They don’t have to be real words; you could use a combination of letters and numbers. Passwords are case-sensitive.
5. Publish your website by clicking the Publish button.
When the message appears saying that your site has been published successfully, click Announce.
The email message notifying people about your website will include the user name and password you specified.
Some of the features in iWeb can’t be used with any hosting service other than MobileMe.
If you publish your website to another hosting service, see “Publishing to a server or hosting service other than MobileMe” in iWeb Help.
If You Already Have HomePage Content on Your MobileMe Site:
If you have previously published webpages using HomePage, they are still available at:
Websites you create in iWeb and publish to MobileMe are available at:
Note: You can’t edit HomePage sites in iWeb.
Making Changes to Your Website:
Most websites need to be updated from time to time.
If you have a blog or published podcasts, you will be making frequent changes.
For these changes to be seen on the Internet, you must republish your site to update the webpages.
When you click Publish (for MobileMe websites), all the sites and pages you changed since the last time you published are published again.
In other words, you can’t publish only selected sites or pages; each time you click Publish or choose one of the Publish commands in the File menu, your published sites will match the sites and pages in iWeb.
Organizing Your Website:
iWeb automatically creates a navigation menu—a table of contents that appears on every page of your website. Users click a page title in the navigation menu to go to that page.
When you add a new page to a site, iWeb automatically adds a link for it to the navigation menu.
You determine the order of items in the navigation menu by rearranging pages in the sidebar.
The navigation menu is automatically updated to reflect the new organization.
 The first page in the sidebar is the website’s homepage and the first page that visitors see when they visit your website.
To make a different page the homepage, simply drag it to the top of the list, just below the site name.
You can create more than one website in iWeb and they all appear in the sidebar.
The first site in the sidebar is also referred to as the start site.
Note: You can prevent a page from appearing in the navigation menu using the Page Inspector.
For more information, see “Modifying the navigation menu (table of contents)” in iWeb Help.
Deleting Webpages, Blogs and Websites:
You can delete a webpage or website by selecting it in the sidebar and pressing Delete.
The webpage is automatically removed from the navigation menu and the content is permanently deleted unless you immediately choose Edit > Undo Delete.
If you already published a website to MobileMe, deleting the site or one of its pages in iWeb doesn’t immediately delete it from the web.
The site or page is removed from the web the next time you publish using iWeb.
A website must contain at least one page, so if you try to delete the only page in a site, the template chooser appears.
When you delete a published website and don’t republish a site with the same site name, anyone who tries to visit the site by typing in the URL or using a bookmark sees a message that the site couldn’t be found.
For more information, see iWeb Help.
Renaming Your Site, Blog or Page:
When you add a new website or webpage, iWeb gives it a default name.
1. The site name appears in your website’s URL:
2. The page name appears at the top of the visitor’s browser window:
 You might want to rename your site or any of your pages to reflect their content.
Important: If you publish a site and later rename it, previously created links to your site (such as bookmarks created by your visitors) won’t work. Be sure to notify your visitors if you rename your site, especially your blog or podcast subscribers.
To rename a site or page:
- Double-click the name in the sidebar and type the new name.


